DIY Button Stamp Tool Tutorial – A number of months back, I came across a bucket list of things I’d like to try that I had made years ago and forgotten all about. I was so thrilled when I browsed through the list and realized that I had done all but one item on my list. Strangely enough though, I had just signed up to take a pottery class – the one missing item from my list. After my first class, it quickly occurred to me that I had fallen in love with what was to become my new hobby. The tactile, hands-on, fingers in the clay thing and the scent of damp earth seemed to fulfill something in my life that I didn’t even know I was missing. One class turned into three classes; three classes turned into nine classes, and now I’ve just signed up for an advanced pottery class for the fall.
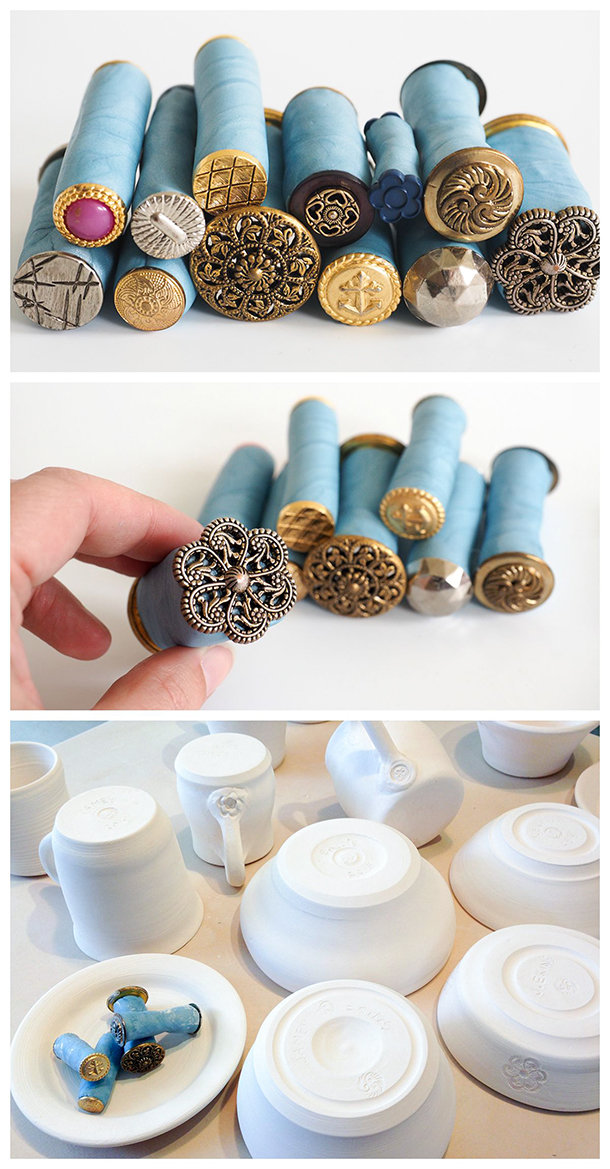
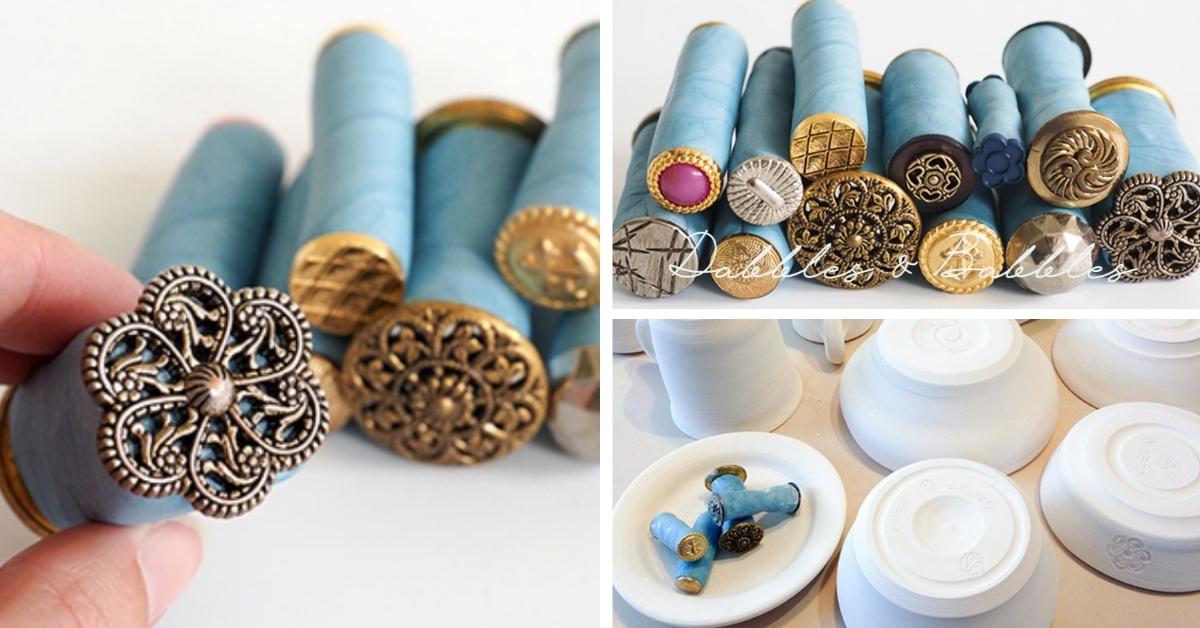
At some point in my research for pottery ideas, I noticed that many of the potters and studios have their signature stamps that they put on all their work. I loved this idea the moment I saw it. I’m still a beginner potter and don’t quite feel like I can use my own signature stamp yet but I still love the idea of having a little extra detail hidden somewhere on the clay piece. One day I popped into a second hand shop and I came across this amazing bag full of antique buttons. For a mere $2 I bought the bag full of buttons and rushed home to figure out how to turn these into stamps. The process is pretty easy and I have to say I couldn’t believe how sturdy and durable these clay stamp turned out. These texture tools are great for pottery clay, polymer clay and the kids will love them for play dough and plasticine.
DIY Button Stamp Tool Tutorial
Materials:
- Buttons
- Polymer Clay (Sculpy, Fimo, etc)
- Nylon string (fishing wire will work)
- Knife
- Cookie sheet with parchment paper
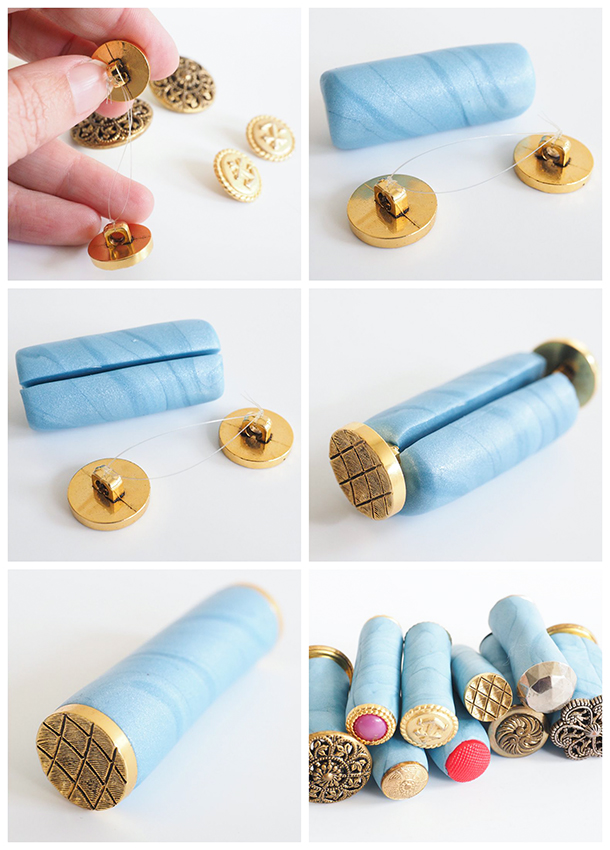
Directions (see photos below):
- Using a 4″ nylon string, find two buttons (similar size works best) and tie the buttons together.
- Roll out a piece of polymer clay and form into a cylinder shape. Make the size of the clay a little shorter than the nylon string with the buttons when pulled taut. The role of clay should also be a little fatter than the width of the buttons.
- Using a sharp knife, cut a slit down the length of cylinder of polymer clay but only half way into the cylinder.
- Pulling the buttons taut, slide the nylon string with the buttons on the ends down into the slit.
- Gently squish the two sides of the cylinder polymer clay together and slowly roll the clay until the clay squishes down to meet both buttons and fills the space behind the buttons.
- Carefully place the button stamp tool onto a piece of parchment paper on a cookie sheet. Bake using the polymer clay baking instructions (I baked mine for 20 minutes at 275 degrees).
- Remove from oven and allow to cool.
Download your easy to make DIY Button Stamp Tool instructions here.
John
September 17, 2015 at 3:53 PM (5 years ago)Your pictures explain it all. What a beautiful way to make it come together.
“Presentation is everything”
Thank you!
Randy Cabell
November 22, 2019 at 9:02 PM (1 year ago)I have gathered some used antique buttons that I am dying to use however I worry that baking some of them for 20 minutes at 275 degrees might harm them or melt them
them. Did this sometimes hhappen when you were making the stamps??
Honey's Quilling
September 20, 2015 at 6:56 PM (5 years ago)These are so cute! I know my girls would love these for their playdough time.
George
January 11, 2016 at 11:07 PM (5 years ago)How fun! I want to make some of those. Thanks for the inspiration!
Jamey
January 19, 2016 at 11:18 AM (5 years ago)Thanks George! What are you waiting for, get on it. These DIY button stamp tools are so easy to make and last forever. Thanks for your comment.
~ Jamey
Kim
January 24, 2016 at 10:57 PM (5 years ago)i love this idea – although I think I will try it with a different button at each end.
Jamey
January 25, 2016 at 11:08 AM (5 years ago)I’m glad you want to give these button stamps a try. The one tip for using different buttons on each end is making sure that the buttons are very close to being the same size. It won’t work as well if you use one small button on one end and a large button on the other end.
~ Jamey
Anonymous
November 13, 2016 at 3:13 AM (4 years ago)Sorry Jamie,but creativity has no bounds,small to large easy.
Rosanna
April 27, 2019 at 11:19 PM (2 years ago)Thanks a loro for the inspiration!!!
DKCampbell
April 1, 2016 at 3:04 PM (5 years ago)Great tutorial…I have 5 shoe boxes full of vintage buttons given to me by a friend and now that I’m trying my hand at PC, I can put them to use…yeah!!!!!
marg west
July 15, 2016 at 10:46 AM (5 years ago)I think I will glue mine to old spools, and use them to print on Fabric!
Cheryl Arcella
September 20, 2017 at 6:34 PM (3 years ago)I like that idea, with the spools and fabric!!! That’s what I thought the buttons were attached to. I have been collecting buttons since I was a little girl, maybe 8 yrs. old, like boy that would collect marbles!! So at age 63 I’m ready to do some of the things I love.
Nancy
December 5, 2017 at 11:17 AM (3 years ago)I was thinking the same. It’s a cute idea!
Mikki
February 13, 2018 at 5:22 PM (3 years ago)That’s what I’ve done with my large box of buttons my great grandma gave me. So board and I too do many house and garden ideas so I did mine on some fence material…. button stamping.
Anonymous
October 4, 2016 at 10:47 AM (4 years ago)Do you use only metal buttons so they don’t melt when baked?
Leah Kistler
November 23, 2016 at 11:14 PM (4 years ago)Love this idea! You are so creative. Could you throw me some different projects that these would be great for? I have a couple of ideas but would really appreciate your inspiration! Thank you for the great idea.
Kerry
February 19, 2017 at 1:23 PM (4 years ago)Are these metal or plastic buttons? If plastic, won’t they melt?
kivi
August 27, 2017 at 7:05 AM (4 years ago)WOW, nice blog and clear instructable about the button stamps!
I’m also picking up clay work as a hobby.
Are those buttons metal? Doesn’t the metal stick to the clay? once you’ve stamp it in can you just lift it clean out?
Anonymous
September 2, 2017 at 9:03 PM (3 years ago)THIS IS SUCH A COOL IDEA, I WILL TRY THEM TOMORROW.
THANK YOU FOR SHARING THE IDEA WITH US.
Stephanie Lewis
October 20, 2017 at 11:09 PM (3 years ago)Thanks for idea, I have a box of button from my Granny and have started doing ceramics. Lots of little bits left over and you have given me the idea on how to use. Thank you.
Jannie
February 18, 2018 at 8:08 PM (3 years ago)Hi, do you have to use metal buttons or they will melt in the oven?
Nancy
May 14, 2018 at 5:19 PM (3 years ago)If you bake at 275 degrees, then the buttons can’t be plastic, right? Thx. Nancy
Nancy
May 14, 2018 at 5:19 PM (3 years ago)If you bake at 275 degrees, then the buttons can’t be plastic, right? Thx. Nancy
Carol
May 30, 2018 at 4:34 PM (3 years ago)I’m just learning about polymer clay and starting to get some things like stamps and I love the idea of making my own. Will the buttons not melt in the oven? If they are plastic will they be affected by the polymer clay? (I’ve read that it can)
Penny
June 4, 2018 at 1:26 PM (3 years ago)This is a wonderful idea! I’m curious about your baking time tho. Isn’t 20 min the average time for 1/4” polymer clay. If your rolls are 1/2”-3/4” wouldn’t you have to bake them longer? I haven’t started polymer clay work yet…just researching and getting a better understanding before I jump in. Thanks for sharing…gotta go and explore your site!
Sharon Hulsey Keef
June 10, 2018 at 2:08 AM (3 years ago)Hi can u tell me where u found out about classes bc I’ve been trying and non of the potters I’ve met are willing to teach they say there to busy
Amanda Slade
June 17, 2018 at 9:14 AM (3 years ago)This is a great idea and will the buttons melt when placed in the oven in the polymer clay?
Anonymous
July 22, 2018 at 9:16 PM (3 years ago)Thanks for sharing.
Anonymous
January 25, 2019 at 8:16 PM (2 years ago)Just ordered some buttons! This is brilliant, so much easier to use than trying to hold the little shanks!
Linda Tillis
February 26, 2019 at 7:20 AM (2 years ago)What an awesome idea! I have been too cheap to buy some stamps to work with and now I can make my own, AND use all those buttons I have been saving for years! Thanks.
Susan Diaz
April 4, 2019 at 7:01 PM (2 years ago)Question . . Your buttons look Lomé they are plastic and/or wood. Doesn’t the plastic melt or the wood burn when you put the clay with the buttons on them in the oven.
Sheila
April 24, 2019 at 6:02 AM (2 years ago)Love it. What if you just glued the button on the end of a used thread spool?
Anonymous
July 6, 2019 at 8:01 PM (2 years ago)Will definitely try this! Thank you????
Chris
August 4, 2019 at 4:44 PM (2 years ago)Hmmmm. This is such a great idea!
How about making “innies” … cure. Then use the cured ones to create “outies” 🙂 Apoxie clays should work too. Thanks so much for boosting my creative thinking!
April F.
August 6, 2019 at 8:29 AM (2 years ago)This is Super Cute! I might use beading wire, rather than fishing line. Thanks for Sharing
Debbie
December 24, 2019 at 5:22 AM (1 year ago)Nice!
Where can I find some if these buttons you have? I have searched for some and have not found any like this
Deborah
March 8, 2020 at 8:47 AM (12 months ago)These would be great for making miniature doll house plates. Love this!